
Know Why Stitchers Need An Embroidery Size Chart
Every person who stitches needs to know how big their design will be. An embroidery size chart is a simple guide that shows the best height and width for different fabrics and items. Without it, you might make your design too big for a shirt or too small for a hat. Using a size chart helps you pick the right hoop, stabilizer, and fabric area. When you follow the chart, your stitches fit perfectly every time. Whether you sew by hand or use logo digitizing for embroidery, a size chart keeps your work neat and balanced. That is why every stitcher, beginner or expert, needs an embroidery size chart.
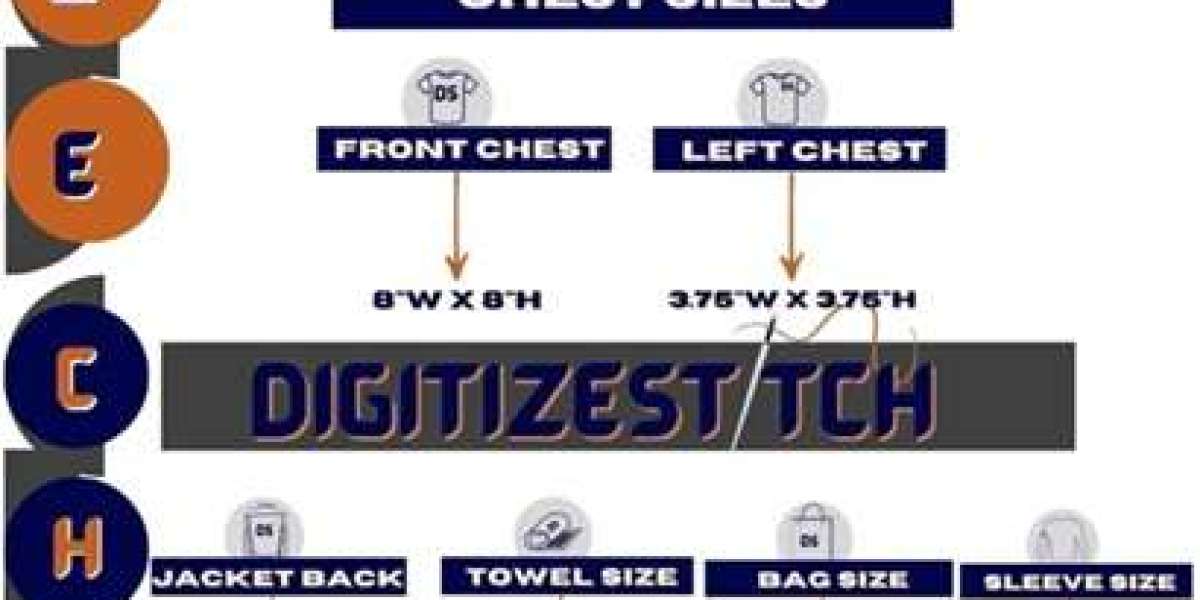
What Is An Embroidery Size Chart
An embroidery size chart is a table that lists recommended design sizes for things like shirt chests, hat fronts, and bag pockets. It usually shows sizes in inches or centimeters. The chart might say 4 inches wide for a left‑chest logo or 2.5 inches tall for a cap. You use it by measuring your fabric and matching those numbers to the chart. The chart takes the guesswork out of choosing sizes and helps you plan how your design will look. With this tool, you can avoid mistakes like stitching off the edge or making details too small to see. A size chart is like a friendly map for your embroidery projects.
How To Measure With An Embroidery Size Chart
Before you start stitching, lay your fabric flat and smooth. Use a ruler or tape to measure the area where you want your design. Write down the width and height on paper. Next, look at your embroidery size chart and find the matching numbers. This tells you the size to set in your software or to draw by hand. Mark the corners of the area lightly with a pencil so you know where to place your hoop. Measuring carefully and using the chart ensures that your final design will fit perfectly and look balanced on your shirt, hat, or bag.
Use Size Charts In Logo Digitizing
When you do logo digitizing for embroidery, you turn a logo into a digital file the machine can read. A size chart is very helpful here. After you load your logo into the software, use the chart’s measurements to resize your design. This makes sure the stitched logo matches the space on your fabric. Without the chart, your logo might be too large for a shirt pocket or too small for a jacket back. By using an embroidery size chart in digitizing, you keep your logo clear and readable. The chart guides you to exact dimensions so your logo stitches come out neat every time.
Pick Hoop Sizes With A Size Chart
Hoop size is important for good stitching. If your hoop is too small, your design might not fit. If it’s too large, the fabric can move, and stitches can snag. An embroidery size chart helps you pick a hoop that is slightly bigger than your design. For example, if your chart says 4 inches wide, choose a 5‑ or 6‑inch hoop. This extra space holds the fabric tight and lets the machine stitch smoothly. By matching your design size to the hoop, you prevent puckers and misaligned stitches. Using a size chart for hoop selection is a simple step to better results.
Work With Embroidery Digitizing Services USA And Size Charts
If you use embroidery digitizing services USA, you send them your artwork and your chart measurements. These services know how to read your size chart and make a file that fits your fabric area. They use your measurements directly in their software. When they return your digitized file, it is ready to stitch at the correct size. This saves you time and avoids mistakes. A U.S. service can also answer questions in your time zone and ship any samples quickly. By sharing your embroidery size chart with digitizing services, you get perfect files that match your project needs.
Test Designs With A Size Chart
Before stitching on your final fabric, always test on scrap cloth. Hoop a piece of scrap fabric, set your machine to the design size from the chart, and stitch. Measure the stitched design against your chart marks to see if it matches. Look for gaps, puckers, or loose threads. If the test does not match the chart, adjust your settings or file. Testing helps you catch errors before you use your good fabric. By using your embroidery size chart in testing, you ensure that the final design will fit and look great on your shirt, hat, or bag.
Use Size Charts For 3D Puff Embroidery Digitizing
3D puff embroidery digitizing uses foam under the stitches to make designs pop out. To get the best puff effect, you must size the foam areas with your embroidery size chart. Measure the foam area on scrap fabric and match it to the chart. Then set your software to cover that foam area exactly. After testing, the raised letters or shapes fit neatly inside the hoop and look even. If the foam area is too big or small, the design can wrinkle or break. Using the chart helps you make a fun 3D puff design that stands up perfectly.
Avoid Mistakes With Size Charts
Beginners often guess how big a design should be and end up with mistakes. Without a size chart, your design might hang off a hat or look lost on a large bag. To avoid these mistakes, always refer to your embroidery size chart before digitizing or hooping. Measure your fabric area, match it to the chart, then resize your design. Mark the hoop area on your fabric so you never stitch outside the lines. By consistently using a size chart, you avoid wasted thread, ruined fabric, and frustration. It’s a simple habit that leads to perfect results.
Save Time And Materials With Size Charts
Using an embroidery size chart saves both time and materials. When you measure and match the chart before you start, you don’t need to rehoop or restitch. You avoid cutting up extra fabric or stabilizer because your design fits right the first time. This efficiency helps you finish projects faster and keeps costs down. You use only the amount of thread and fabric you need. By following the chart, you also reduce trial-and-error tests. A few minutes spent with the size chart at the beginning pays off with neat stitches and less waste.
Keep A Size Chart Notebook
To make size chart use even easier, keep a small notebook or spreadsheet of your most-used measurements. Write down item names—like “Cap Front – 2.5 in” or “Shirt Chest – 4 in”—next to chart entries. Keep this notebook by your machine or computer. When you start a new project, you can glance at your notes instead of re-measuring each time. This saves time and helps you remember which sizes worked well on which items. Over time, your notebook becomes a personal size chart that fits your favorite fabrics and hoops.
Go Beyond Size Charts In Your Embroidery Journey
A size chart is an essential tool, but your embroidery journey also includes learning stitches, colors, and textures. Try experimenting with different stabilizers, threads, and 3D puff techniques. You can combine size chart measurements with creative stitches to make unique designs. As you gain experience, you’ll learn which sizes, hoops, and stitches look best on various items. Keep using embroidery digitizing services in the USA when you need expert files. Also, practice logo digitizing to sharpen your skills. With a size chart and ongoing practice, you’ll create beautiful, professional embroidery projects every time.


